2/Lt D.V. Hutchinson had now been stationed with the 12th Field Company RE at Mersa Matruh for just over 3 months, having disembarked on 28 August 1940. He arrived to a continuous scene of heavy bombing from enemy aircraft, with hundreds of shells falling in the area on a daily basis. In between air raids, the 12th Field Company RE were building reinforcements, pill boxes, digging anti-tank ditches, slit trenches, revettements and mine laying; as part of the Defence Programme.
1940, October – laying mines at Mersa Matruh. IWM E839
The 12th Field Company RE formed part of the Western Desert Force which recently saw a change in title from the 6th Division in June 1940. The Company served within the 22nd Infantry Brigade under Brigadier J.T. Leslie, which also saw a name change in September 1940, when it was redesignated Headquarters Matruh Fortress and ceased to be an infantry brigade. The number was subsequently reused to designate the 22nd Guards Brigade of which the 12th Field Company RE would later serve. The Western Desert Force was led by Middle East Commander-in-Chief, General Archibald Wavell and they would soon be moving west into Libya as part of the Allied offensive Operation Compass.
The Company was split into 3 Sections to defend seperate sectors, plus H.Q. liasing with 8th Field Regiment RA who were based at the Fortress armed with eight 18pdrs and eight 4.5″ Howitzers. They were quartered in the Admin Area with the main Battle Roles of – Anti Parachute troops, tanks or infantry penetration and aircraft. ‘Tank Hunting’ parties were to be ready to attack and destroy, during darkness; and ordered to be ‘offensive and ruthless’. All personnel were trained to be thoroughly familiar with the tank obstacles, minefields, and wire in their and adjoining sectors, to enable them to move by night quietly and with confidence.
The Section Battle locations were:-
No.1 Section – East Spit Area, across the salt lakes. (2/Lt HUTCHINSON) – liaising with 2nd Kings Own
During this period 12th Field Company R.E. were serving alongside several other Royal Engineer Field Companies including the 2nd Field Company and the 54th Field Company in the Mersa Matruh battle positions recently vacated by the 42nd Field Company. As well as the infantry units mentioned above they also liaised with the 1st Cheshires at this time.
Dummy Tanks
With the advent of the tank appearing during the First World War, so did the creation of the first Dummy Tanks or ‘Spoofs‘. The early designs were crudely constructed from timber, covered in hessian and painted; with some even having wheels so they could be towed around by horses.
Dummy tanks saw significantly more use during World War II by both the Allies and the Axis. German forces utilized mock tanks prior to the start of the war for practice and training exercises.Their use in military deception was pioneered by British forces. It was a strategy born from the creativity of artists and tradesmen, who used their skills to develop a myriad of camouflage techniques. Generally speaking they came in two forms, consealment and display. The former had been long recognised but the use of display was yet to be realised.
1942 – Troops carry a Dummy Stuart Tank. IWM E10147
During the Western Desert Campaign, this really took off with many renowned artists joining the Royal Engineers to use their creative skills to deceive the enemy.
Edward Seago was commisioned to the Corp in 1939 and was a lifelong friend to Field Marshal Auchinleck who he advised on developing camouflage techniques later in the war. Artist and poet Roland Penrose also joined the Royal Engineers as a Captain.
Film director Fred Pusey along with artist Steven Sykes remarkably created an entire dummy railhead at Misheifa for Operation Crusader.
Art film director Peter Proud joined forces with Steven Sykes and artist John Codner who joined the Royal Engineers in 1940, to create a dummy port at Ras el Hillal during the Siege of Tobruk in late 1941.
1941 – Sappers of the 9th Division make a dummy plane at Tobruk. AWM 020685
The following year, Geoffrey Barkas along with fellow Royal Engineer and artist Tony Ayrton led the Middle East Command Camouflage Directorate at Helwan near Cairo along with many of the men above, Barkas also scouted other artists such as Brian Robb who was a bored private soldier. They created a vast array of deceptions including dummy hangars, aircraft, jetties, oil pipelines and dummy wrecked barges at Tobruk Harbour; this culminated in Operation Bertram at El Alamein in August 1942.
Another interesting character of the time was magician turned Royal EngineerJasper Maskelyne who claimed to introduce many methods of deception during this period, but these claims have since been disputed by fellow camoufleurs.
Early examples also mention Royal Engineers constructing around two dummy tanks per day in April and June 1941, building a final third entire Royal Tank Regiment by November of the same year. These numbers reinforce how impressive the scale of construction by the field workshop of the 12th Field Company RE and the other Sappers during the period described below.
As the cover image shows, Royal Engineers were building Dummy Tanks utilising the skills of carpenters in France, as early as March 1940. The following article confirms this practise, as the 12th Field Company RE War Diary (WO 169/397) explains when 2/Lt D.V. Hutchinson oversaw the workshop at Mersa Matruh, where the Sapper carpenters worked continuously for 36 hours to create a staggering 88 dummy tanks.
There is evidence in Octobers diary of this plan in the making, as the request was put out for reinforcements of carpenters to be sent up to the Fortress.
1940 War Diary – Call of the ‘Chippie’. (WO 169/397)
Mersa Matruh5/12
At 1700 hrs 21 carpenters of the 12th Field Company RE were ordered to proceed to workshops.
They commenced work at 1800 hrs and continued work through the night.
Hot tea was arranged by 2nd Fld Coy.
Bad sand storm and the lack of transport seriously held up the works.
6/12
At 0100 hrs 2/Lt Hutchinson R.E. took over supervision of the workshops until 0800 hrs.
Breakfast and dinner was supplied & work continued on throughout the day.
By 1700 hrs the carpenters of the 12th Field Company RE in conjunction with those of 2nd & 54 Field Coys had constructed 88 dummy tanks.
They had worked continuously for 36 hours.
At 1600 hrs 19 O.R.'s reported at the R.E. workshops to relieve carpenters of assembling, painting and loading up of dummy tanks. This completed & lorries loaded up ready for dispatch @ 1730 hrs.
Two ORs detailed to accompany O.C. 2 Fld Coy to act as guides to Lorries.
2/Lt Hutchinson R.E. & C.Q.M.S took over duty @ workshops from 1200 hrs to 1730 hrs.
7/12
All carpenters excused duty at special request of C.R.E.
2 O.R.s detailed as guides to Lorries transporting dummy tanks returned.
Convoy of 8 - 30 CWT Lorries returned to await further orders.
A transport convoy moving out from Libya.IWM CM 5067
At the time of writing, the destination and purpose of those 88 dummy tanks is unknown. It is quite possible they were transported up the line to deceive Italian intelligence as the Allied forces began to move East for the start of Operation Compass. Nor is it known whether this schedule of construction had been headed up by any particular camoufleur or expert in the field of military deception.
1942 – Germans wasted a lot of ammunition on this dummy tank. AWM 024900
Just days later, on 15 December 1940, 2/Lt D.V. Hutchinson led No.1 Section of the 12th Field Company RE from Headquarters Matruh Fortress to a camp 1 1/2 miles East of Sidi Barrani. Here they immediately began to salvage the R.E. material left on the battlefield after the 16th Infantry Brigade along with part of the 11th Indian Brigade and artillery support of the 7th Royal Tank Regiment, had relieved the town from the 4th CC.NN Division “3 Gennaio” on the night of 10 Dec. I hope to cover this period in more detail in the near future, as the Allied forces made their way across the Western Desert during this action, until February 1941.
The following year Captain D.V. Hutchinson and the 12th Field Company RE utilised further methods of camouflage and deception when they were in the beseiged garrison of Tobruk. Continuing the remarkable works of the 2/7th Field Company RAE, they built disguised aircraft hangars in a shallow wadi near El Gubbi aerodrome on 21 November 1941.
1941 – Tobruk, hidden hangars at El Gubbi. AWM 020474
The video below was made to give an indication on the distance and topography that faced the fighting forces of the Western Desert. Many battles were lost through overstretched supply chains and the sheer logistics involved in this war of attrition.
1941 – Topography of the Western Desert by Nathan Hutchinson.
TOP COVER IMAGE – 1940. Dummy Cruiser tanks constructed by Sappers near Rouen. IWM F3820
Please look out for upcoming articles to find out the incredible journey of D.V. Hutchinson as he and his 12th Field Company continue to operate within the Garrison of Tobruk as the Siege begins to lift into December 1941.
Feel free to follow @UbiqueVir on Twitter for updates.
46 days into their time in the garrison of Tobruk, recently promoted Captain D.V Hutchinson M.B.E. and the 12th Field Company R.E. were now settled in to the day to day routine of life under siege, having taken over the positions vacated by 20th Australian Brigade in the Southern Sector.
The 12th Field Company R.E. were as battle hardened as any engineer unit in the Western Desert at this time. Along with Field Companies such as the 2nd and the 54th of the Royal Engineers, they formed part of the newly named XIII Corps (Western Desert Force) that saw almost continued action since they left HQ Mersa Matruh in 1940.
The 12th Field Company R.E. were now serving as part of the 23rd Infantry Brigade under Brigadier C. H. V. Cox, with the 2nd Battalion Black Watch, 4th Battalion Border Regiment, 1st Battalion Essex Regiment, and the 23rd Infantry Brigade Anti-Tank Company. The Brigade formed part of the 70th Division.
It is worth noting that the British Royal Engineers worked closely alongside engineering units from Poland, Czechoslovakia, Australia, New Zealand, India, South and WestAfrica; sharing vital equipment and taking over each others works.
1941 – Tobruk. Morning patrol crossing the wire.
War Diary
The following account is taken from the 12th Field Company R.E. war diaries (WO 169/1867) as written by Captain D.V Hutchinson M.B.E. They had carried out numerous operations alongside The Durham Light Infantry, with “D” Company in particular suffering many casualties earlier in the year at Fort Capuzzo during Operation Brevity.
TOBRUK9/11
Work continued as usual on the Blue Line & P.O.W.
Cpl NICHOLS buried in Tobruk War Cemetery.
Received a letter of sympathy & appreciation from Brig Cox Commanding 23 I.B.
Night
3 Section under command of 'D' Coy 1 D.L.I. raided "PLONK".
L Cpl BATES awarded.
At 1900 hrs Sunday 9/11/41, 3 N.C.O.s and 6 Sappers of No.3 Section R.V., at Kilo 6 EL ADEM Road, with O.C. "D" Company 1st Bn. The Durham Light Infantry. Object was to assist "D" Company that night to raid "PLONK" and enemy strong point about 1000x from our own front lines.
1941 – Map of Tobruk
The raiding party moved to the F.V.P approximately 500x from the enemy lines. The enemy were very jumpy sending up flares and firing bursts from M.G.s along fixed lines. Italians could be heard singing and a dog barking. The party was now in fighting formation of three platoons, R.E. N.C.O.s in front with platoon Commanders followed by the Sappers, carrying a Bangalore Torpedo each, and then the Infantry. Each Sapper also carried one pair of wire cutters and a Tommy Gun.

Account of one of the Sappers present says:-

"When Zero hour 2157 came we moved slowly forward the Sappers on the left flank laying down white tape to guide the party on the return. Our Artillary opened up at the same time and put down a barrage along our front on the enemy positions to cover our advance.
M. Gunners opened up to keep the enemy's heads down. The Infantry were moving well by now with not much interference from the enemy.

Then came a big surprise. A ball of flames roared across our front for about 400x giving off volumes of smoke. We stopped, rather surprised and waited for its recurrance. It did not reappear so we moved on. By this time the enemy had a good idea where we were and swept the area with M.G. fire. A M.G. on the right flank was proving troublesome but a member of the party moved towards it and silenced it with a burst from his Tommy gun.
1941 – Sappers inserting a Bangalore Torpedo into barbed wire, Egypt. Source
In the flashes we could see the enemy wire and on orders from the O.C. of the Company, N.C.O.s and Sappers of the of the forward platoons moved forward. We prepared to cut it with Bangalore Torpedoes but found the wire only two feet high so cut it with the cutters and then looked for mines. Giving the signal all clear to the infantry they charged into a concentration M.G. and Mortar fire. Our Infantry tried very hard to get the enemy's guns but the latter were too numerous.

The order was given to withdraw and it was during this that a number of our lads got hit whilst getting back through the wire. Now, every man for himself, we withdraw to our front posts collecting the wounded on the way."

L/Cpl. Bates who received a bullet wound in the mouth was the only Sapper wounded.

Spr. Drengin F when ordered to withdraw stayed in "No Mans Land" assisting to bring in the wounded.

The attacking party did not expect to contact the two ft. high wire before the main position being reached unobserved.

The "Flaming Football" was a novelty never before encountered round TOBRUK. Particulars of which are conflicting.

Members of the party were:-
L/Cpl. Bates
L/Cpl. Chivers
L/Cpl. Smith
Sapper Drengin
Sapper Higginbottom
Sapper Harris T
Sapper Hackham
Sapper Vaughn
Sapper Drengin was subsequently recommended for the Military Medal for his actions during the raid.
The video below was made to give an indication on the distance and topography that faced the fighting forces of the Western Desert. Mapping was vital in understanding the terrain and the sheer logistics involved in this war of attrition.
Discover more on Lieutenant D.V Hutchinson M.B.E. attending courses on aerial photography & bomb reconnaisance in Egypt, 1941 here.
1941 – Topography of the Western Desert by Nathan Hutchinson.
TOP COVER IMAGE – 1941 Tobruk. British Infantry advance.
Look out for the next article to find out the incredible journey of D.V. Hutchinson as he and his 12th Field Company carry on with life in the beseiged port of Tobruk. They would spend the remaining month working in extreme conditions preparing for the upcoming breakout.
Feel free to follow @UbiqueVir on Twitter for updates.
Lieutenant D.V Hutchinson M.B.E. and the 12th Field Company R.E. had now been in Torbruk Garrison for four days, situated at a camping area near the prisoner of war cages (22 on the map) to the east. Work mainly involved mine laying, defence work on the Blue Line (Red Line at night only), building observation platforms, machine gun and anti-tank gun positions for infantry as well as anti-tank ditches. Other day to day tasks involved road repairs, gravestone construction, and going on night time patrols, destroying enemy dumps.
The 12th Field Company R.E. were now serving as part of the 23rd Infantry Brigade under Brigadier C. H. V. Cox, with the 2nd Battalion Black Watch, 4th Battalion Border Regiment, 1st Battalion Essex Regiment, and the 23rd Infantry Brigade Anti-Tank Company. The Brigade formed part of the 70th Infantry Division of the British Eighth Army, along with the various Battalions of the 14th Infantry Brigade and 22nd Guards Brigade which Lieutenant D.V Hutchinson M.B.E. had already served alongside.
The following photo journal is created from the 12th Field Company R.E. war diaries (WO 169/1867) covering the month of October 1941. Along with images of the time, giving a short insight into the life of a Sapper in the besieged Tobfort.
The actual 12th Field Company R.E. war diaries are written by Lieutenant D.V Hutchinson M.B.E. between the dates of 22 September to 14 October & 19 October to 15 November. During this period, the following entries are written about him:-
19/10 – Lt HUTCHINSON commenced survey of Blue Line defences by compass traverse.
The video below was made to give an indication on the distance and topography that faced the fighting forces of the Western Desert. Mapping was vital in understanding the terrain and the sheer logistics involved in this war of attrition.
Discover more on Captain D.V Hutchinson M.B.E. attending courses on aerial photography & bomb reconnaisance in Egypt, 1941 here. These courses may have proved vital in his understanding of the terrain that faced him beyond the lines of Tobruk.
1941 – Topography of the Western Desert by Nathan Hutchinson.
TOP COVER IMAGE – 1941. Map of Tobruk with original images from the D.V.H. Collection showing location of O.P. tower & cemetery.
Please look out for upcoming articles to find out the incredible journey of D.V. Hutchinson as he and his 12th Field Company continue their Sapping duties in the beseiged port of Tobruk. They would spend the next two months working in extreme conditions and dealing with the harsh day to day routine of life in Tobfort.
Feel free to follow @UbiqueVir on Twitter for updates.
This article has come about from an unusual turn of events, that has finally put a name to a tragic story mentioned in passing between two soldiers from different generations; about the accidental death of a Sapper in his own trench.
1942 – A driver writes home from a slit trench in the Western Desert. IWM E 18362
On 8 December 1990, Colonel D.V. Hutchinson M.B.E. (71 years old, retired) had written a letter to Major Gordon Lane, Officer Commanding 12 Field Squadron, 25 Engineer Regiment Royal Engineers. In this letter, Colonel D.V. Hutchinson M.B.E. expresses his best wishes and thoughts to the 100 men of the Squadron who were in the process of deploying to the Persian Gulf for what would be known as Operation Granby.
He also enclosed “a small donation towards the Squadron funds as a small contribution towards the better enjoyment of the ‘festive season’ by the troops”. Then went on to explain a brief history of his time serving with 12th Field Company between 1940 to 1944 when, by common consent and usage, it became a Squadron.
But it was reading the closing paragraph of the letter that really stuck with me, and for several years I would be none the wiser to the origin of the accident. Colonel D.V. Hutchinson M.B.E. ends the letter with…
“Well, I appreciate that you must be a very busy man and I have taken up far too much of your time. I thought I am not going to ask what you are doing or offer advice, except in one small aspect, which will enable me to sleep more peacefully at night if I have warned you about it.
It is this – if your men have to sleep in slit trenches do make them take care not to be buried alive; not because the trench may collapse but from very fine sand drifting and sifting in and suffocating them whilst they sleep. Some men, when tired or tight, sleep very soundly and are unaware of the danger.
Unfortunately I had two such separate accidents in the Western Desert when very fine sand disturbed by winds or earth shaking ‘activities’ covered them. I had to instruct night sentries to inspect all slit trenches.”
Quote from letter, Colonel D.V. Hutchinson to Major Gordon Lane – dated 8 December 1990
At the time, I only had the limited information found within the personal collection of Lt. D.V. Hutchinson, when he joined the Company in Mersa Matruh, August 1940; access to the 12th Field Company 1941 War Diary and the information available at the remarkable Commonwealth War Graves Commission website. There was no indication any men of the 12th Field Company had died from an incident that wasn’t already described in the diary during their time in North Africa and the Middle East.
It was only recently, when I was generously gifted the 12th Field Company RE. war diary for 1940 (WO 169_397), that I came across the sombre entry below.
September 21, 1940.

Spr. JONES discovered dead in slit trench at 0730 hours.
Part of the trench had fallen in burying Spr JONES to a depth of 18 ins.
He had been dead some time when found.
Court of Enquiry, held at 1600 hrs, found that death was accidental and that neither the deceased nor any other person could be blamed.
The M.O. gave as his opinion that death was due to heart failure as a result of asphyxiation.
The deceased was buried at 1730 hrs in MATRUH War Cemetary.


September 21, 1940.

Court of Enquiry re held on death of Spr Jones in order to obtain more evidence.
This surely describes one of the poor unfortunate souls that Colonel D.V. Hutchinson M.B.E. mentions in his letter over 50 years later. An incident that obviously still weighed heavily on his mind. But it still didn’t explain how Sapper Jones was not listed in the War Diary as were the other casualties in his unit at the time.
This time, I now had a name and a location to go back to the C.W.G.C. to search again. Initially there were no results until I changed location/unit and found a Sapper James Richard Jones 1883047, who died on 20 September 1940 at the age of 21. He, in fact, served with 217 Army Field Company RE and must have been attached to the field works in Mersa Matruh, where he was buried in the War Cemetery. It is not know if he was later moved to El Alamein War Cemetery or is commemorated there.
It is on that note that, in memory of Sapper James Richard Jones 1883047, also the second missing Sapper that died in a terrible accident and the long lasting affect it had on Colonel D.V. Hutchinson M.B.E.; I remember their ultimate sacrifice many miles from home.
RIP – Sapper James Richard Jones 1883047 – C.W.G.C.
All other details within this article were obtained from the recollections of Col DV Hutchinson MBE and the war diaries of the 12th Field Company RE. 1940. WO 169_397.

If you wish to read about Lt. D.V. Hutchinson as he prepares to move East during Operation Compass, please read the 12th Field Company Royal Engineers WWII North Africa and The Middle East which includes further links to more detailed articles.
1941 – Looking along the wharves of Tobruk Harbour. AWM 020601
Having only just arrived by destroyer at 2330 hrs the night before, Lieutenant D.V Hutchinson M.B.E. and the advance party of the 12th Field Company R.E. had now moved to a camping area near the prisoner of war cages in the garrison.
As described in the previous article they had just moved down from Palestine on 19 September, where they had been in support of the 14th Infantry Brigade having only recently deployed to Damascus from the Western Desert in July.
The 12th Field Company R.E. were now serving as part of the 23rd Infantry Brigade under Brigadier C. H. V. Cox, with the 2nd Battalion Black Watch, 4th Battalion Border Regiment, Czechoslovak 11th Infantry Battalion, and the 23rd Infantry Brigade Anti-Tank Company. The Brigade formed part of the 70th Infantry Division of the British Eighth Army, along with the various Battalions of the 14th Infantry Brigade and 22nd Guards Brigade which Lieutenant D.V Hutchinson M.B.E. had already served alongside.
Shortly after their arrival, the 23rd Infantry Brigade was joined by 1st Battalion Essex Regiment, in place of the Czechoslovak 11th Infantry Battalion who went to the 1st Polish Carpathian Brigade and the 189 Field Ambulance. Taking up the former positions of 20th Australian Brigade in the Southern Sector.
The text below is written in a document describing the brief history of the 23rd Infantry Brigade, detailing the Brigades move to Tobruk.
For those who have not been to Tobruch a short description of the place may be of interest. Round the perimeter (some 28 miles in length) ran for the greater length an anti-tank ditch beyond which lay simply desert and the German lines. Behind this ditch lay barbed wire and mine fields and behind this again lay the main defences. These consisted of a series of strong points each surrounded by its own anti-tank ditch. The strong points were constructed by the Italians and consisted of reinforced concrete underground sleeping quarters, ammunition stores and innumerable passages connecting up weapons pits which reminded one of a rabbit warren. Between each strong point lay ordinary dugouts and weapon pits.
Behind the outer perimeter lay a further middle perimeter and behind that again lay the inner perimeter. At the centre of this semicircle was the harbour, strewn with sunken ships, and the bomb-blasted town. In and around this area lay the nerve centre of the garrison and the objectives which attracted so much attention from enemy planes.
Day-to-day duties were arduous and the garrison seldom if ever enjoyed a complete night in bed. Rest was obtained by day as far as flies and enemy action permitted.
A Brief History of 23rd Infantry Brigade May 1941 to Feb 1945.
The following details are taken from the 12th Field Company R.E. war diaries (WO 169/1867) over the first few days in the Garrison, as they settle in to their new day-to-day routine.
Polish Independent CarpathianRifle Brigade
As you can see from the war diary entries above, these early days were spent alongside the 1st and 2nd Polish Engineer Field Companies of the Polish Independent Carpathian Rifle Brigade under General Stanisław Kopański, who had a grounding in engineering himself. The brigade was formed in Homs on the Syrian border in April 1940, comprised mostly of Polish soldiers who were able to escape the prisoner of war camps in Hungary and Romania, specialising in mountian warfare. By June 1940, under the orders of General Władysław Sikorski, Kopański had left the French-controlled territory and joined the British Army with a Brigade of roughly 5,000 men. Among the distinctive features of the unit was the high morale of the soldiers, all volunteers. In addition, roughly 25 percent were educated, a thing uncommon in European armies of the time.
The Polish Independent CarpathianRifle Brigade arrived in Tobruk a month before Lieutenant D.V Hutchinson M.B.E. and the 12th Field Company R.E. Transported in seven convoys, between 21 August and 28 August, the Brigade initially took over the southern sector, opposite the Italian 17th (Pavia) Division. In October the entire Brigade, along with the Czechoslovak 11th Infantry Battalion under Colonel Klapalek relocated to the ‘Gap’, a 20 km defensive line on the Western flank of Tobruk, where German & Italian forces had secured strategic high ground back in April. It was here, under constant observation of the enemy, in shallow slit trenches that they experienced their first significant losses.
The Poles earned a fearsome reputation and held onto their positions from September through to November 1941 with the area around Ras el Madauer being the bloodiest of battles. The morale of the Polish troops was lifted considerably soon before Operation Crusader, when the Supreme Commander General Sikorski visited, at great risk to his own life behind enemy lines, in mid November 1941.
1941 – General Sikorski inspects the Polish troops of tobruk, shaking hands with an officer he decorated. AWM 010611
Interestingly, Lieutenant D.V Hutchinson M.B.E. writes in the war diaries of difficulties communicating with the Polish Field Engineers, who themselves had only recently taken over the fieldworks and learnt the many dangers of the surrounding terrain and enemy positions from the respective Field Company RAE of the 9th Australian Infantry Division, before they disembarked. The potential for miscommunication at this time must have been quite high, and the only way to ensure full understanding of the situation would have been for each unit to accompany their respective allies on nightly patrols to see the lines first hand. Although, difficulties evacuating the last of the Australian 9th Division troops resulted in several Infantry Battalions stranded in Tobruk for the entirety of the Siege, who were subsequently attached to the Polish Brigade which would have helped them with the Australians considerable knowledge and experience of the ongoing situation.
1941 – Polish & British Officers checking artillery plans in Tobruk. AWM 020980
Again, this further illustrates how closely the British, Australian and New Zealand troops worked with the many unsung heroes of these campaigns, that continually fail to be recognised for their incredible efforts. The Indian, Polish, Czechoslovak, West African, South African troops, and not forgetting the thousands of indigenous workers and levies that formed in areas of conflict. Without which the Allied victory would have surley failed, a truth that a large number historical accounts continue to omit.
The video below was made to give an indication on the distance and topography that faced the fighting forces of the Western Desert. Mapping was vital in understanding the terrain and the sheer logistics involved in this war of attrition.
Discover more on Lieutenant D.V Hutchinson M.B.E. attending courses on aerial photography & bomb reconnaisance in Egypt, 1941 here. These courses may have proved vital in his understanding of the terrain that faced him beyond the lines of Tobruk.
1941 – Topography of the Western Desert by Nathan Hutchinson.
TOP COVER IMAGE – 1941 June Tobruk RAE/ RE share drill.
Please look out for upcoming articles to find out the incredible journey of D.V. Hutchinson as he and his 12th Field Company continue their Sapping duties in the beseiged port of Tobruk. They would spend the next three months working in extreme conditions and dealing with the harsh day to day routine of life in Tobfort.
Feel free to follow @UbiqueVir on Twitter for updates.
1941 – Three New Zealand Soldiers on the Derna Road, 20 December. NZ NatLib Source
On 19 September 1941, Lieutenant D.V Hutchinson M.B.E. led the advance party of the 12th Field Company R.E. on the road back to Tobruk.
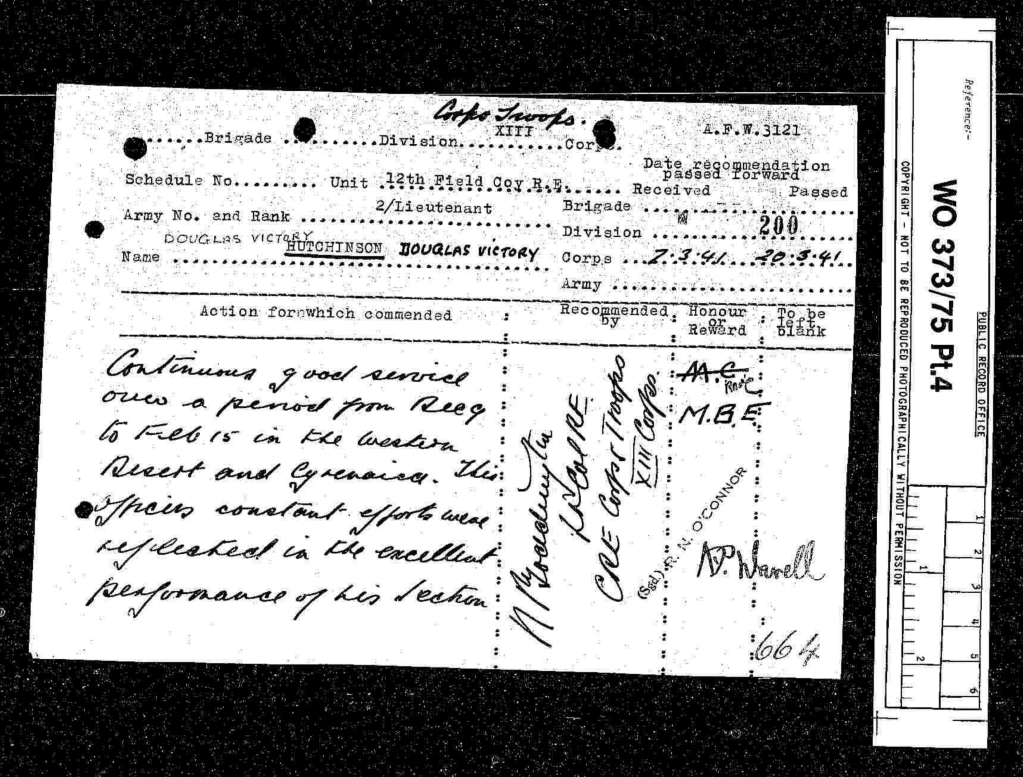
In the 8 months since he entered Tobruk earlier on in the year, much had changed at an operation level of the British Army. Back in January the 12th Field Company R.E. formed part of the newly named XIII Corps (Western Desert Force) led by Lieutenant General Richard O’Connor under Commander in Chief, Field MarshallArchibald Wavell. They moved through the port in the middle of January, during Operation Compass. This successful offensive saw Lieutenant D.V Hutchinson earn his M.B.E. at the age of 22, for his ‘continued good service & constant efforts that were reflected in the excellent performance of his Section‘ whilst in support of the 7th Armoured Brigade as they advanced across the deserts as far as Soluch Garrison in Libya (as described here) on 6 February 1941.
1941 – 2/Lieutenant Douglas Victory Hutchinson M.B.E. commendation.
Only a matter of days later Lieutenant D.V Hutchinson M.B.E. and the 12th Field Company R.E. were back in Tobruk at the transit camp, where Commander of C.R.E. MatruhColonel Ullman entertained the officers, W.O.s’ & senior N.C.O.s’ in recognition of their service. On 15 February, they sailed from Tobruk back to Tahag Camp, Egypt.
At the same time, Wavell begrudgingly followed through with his orders to halt the advance in Libya and send troops to Greece to defend against the Italians & Germans attacking there. This fateful decision allowed the Germans to reinforce the Italians in North Africa with the Afrika Korps. Wavell had found a formidable adversary in the German Generalleutnant Erwin Rommel, who wasted no time in launching his counter offensive, Operation Sonnenblume which saw Tobruk cut off during the Allied retreat, leaving a beseiged garrison consisting mostly of the 9th Australian Division (Lieutenant-General Leslie Morshead), remains of the British 2nd Armoured Division (Major-General Michael Gambier-Parry) and the battle weary 3rd Indian Motor Brigade (Brigadier E. W. D. Vaughan). During this rout, both the commander in Cyrenaica Lieutenant-GeneralPhilip Neame and Lieutenant-General Richard O’Connor who was recently appointed General Officer Commanding-in-Chief the British Troops in Egypt were captured by a German patrol as they attempted to make their way to their new headquarters in Tmimi.
The 12th Field Company R.E. served with the 22nd Guards Brigade as part of the 4th Indian Infantry Division in the XIII Corps, during the subsequent relief Operations. But both Operation Brevity (15–16 May) and Operation Battleaxe (15–17 June) failed in their objective of relieving Tobfort. As a consequence, Field MarshallArchibald Wavell was replaced as Commander-in-Chief Middle East Command, by Claude Auchinleck in July 1941. Wavell took a move to Syria, with Lieutenant D.V Hutchinson M.B.E. and the 12th Field Company R.E. with the 14th Infantry Brigade closely following as Operation Exporter came to an end.
The final stage of the relief effort took place between 12 and 25 October. The remaining elements of the 70th Division were transported into Tobruk and the remaining Australian 9th Division in the garrison (save the 2/13th Battalion and elements of the 2/15th Battalion) were shipped out.
The 12th Field Company R.E. were now serving as part of the 23rd Infantry Brigade under Brigadier C. H. V. Cox, with the 2nd Battalion Black Watch, 4th Battalion Border Regiment, Czechoslovak 11th Infantry Battalion, and the 23rd Infantry Brigade Anti-Tank Company. The Brigade formed part of the 70th Division, along with the various Battalions of the 14th Infantry Brigade and 22nd Guards Brigade which Lieutenant D.V Hutchinson M.B.E. had already served alongside.
Shortly after their arrival, the 23rd Infantry Brigade was joined by 1st Battalion Essex Regiment, in place of the Czechoslovak 11th Infantry Battalion who went to the 1st Polish Carpathian Brigade and the 189 Field Ambulance. Taking up the former positions of 20th Australian Brigade in the Southern Sector of the 17,000 yard perimeter.
The following excerps are taken from the 12th Field Company R.E. war diaries (WO 169/1867). Lieutenant D.V Hutchinson M.B.E. led the vanguard section, leaving the rest of the Company on 19 September 1941, arriving in Alexandria on 26 September.
The video below was made to give an indication on the distance and topography that faced the fighting forces of the Western Desert. Mapping was vital in understanding the terrain and the sheer logistics involved in this war of attrition.
Discover more on Lieutenant D.V Hutchinson M.B.E. attending courses on aerial photography & bomb reconnaisance in Egypt, 1941 here.
1941 – Topography of the Western Desert by Nathan Hutchinson.
TOP COVER IMAGE – Hand-drawn map of Tobruk – Emery.
Read the next article here to find out the incredible journey of D.V. Hutchinson as he and his 12th Field Company arrive in the beseiged port of Tobruk. They would spend the next three months working in extreme conditions and dealing with the harsh day to day routine of life in Tobfort.
Feel free to follow @UbiqueVir on Twitter for updates.
1941 – Luftwaffe bomb reconnaissance photo of Israel coast. Source
At this time Lieutenant D.V Hutchinson M.B.E. and the 12th Field Company R.E. had been stationed at Zahle in Syria since arriving on 11 July 1941 as the ceasefire fell on the Battle of Damascus. As part of the 14th Infantry Brigade under C.R.E. 6th Infantry Division they had been serving alongside the 2/15 Field Company of the R.A.E., taking over various works such as water points, road construction and attending bridging camps, lectures on mines, as well as continued hardening training on the nearby Col de Cednes and Mount Hermon.
This article describes the first mention of Douglas Hutchinson attending specialist courses in reconnaissance and aerial photography, a skillset that remained with him throughout his 32 year career in the military; later in Royal Engineer Topographical Squadrons of the 42 Survey Engineer Regiment in the 1950s, the Chief Geographical Branch AFCENT/NATO in the 1960s and finally as Deputy Director of Field Surveys for Ordnance Survey in the 1970s. Following details are taken from the War Diaries (WO 169/1867) and images used with the accredited sources.
Bomb Reconnaissance
Zahle

28/8
Lieutenant Hutchinson R.E. attended a lecture on Bomb reconnaissance at Baalbeck.
Mobile cinema visited M.D.s at Zahle.
In the years leading up to the Second World War there had been gradual technical progress in the leading air nations, which led to advances particularly in photogrammetry and cartography, but this subsequently failed to be translated into a capable operational reconnaissance capability. The various parties went into the new war with mostly the same cameras and procedures they had used when exiting the last one. Experience would soon prove that bombing was completely ineffective unless accompanied by intensive aerial reconnaissance.
By 1941, the RAF had a capable reconnaissance arm and despite a considerable technological and numerical head start, Germany gradually neglected aerial reconnaissance, reasoning that they had no strategic bombing doctrine and viewed air power as an auxiliary of land armies. The Allies had established numerous papers, integrating reconnaissance and interpretation capability as a core national security asset, leading to a greater understanding in the field, and Officers like Lieutenant D.V Hutchinson M.B.E. attending such courses to learn the subject.
1942 – Allied air raid on Martuba nr Derna. Source
Zahle29/8G.O.C.in C. in M.E. interviewed all C.O.s at Rayak Aerodrome.
Lieutenant Hutchinson left for Cairo to attend a seven days course on Aerial Photography.
Lieutenant Musgrave left for Cairo on leave.
Lieutenant D.V Hutchinson M.B.E. travelled back to Egypt to attend a 7 day course on aerial photography.
Airman hands magazines of film from Type F.24 aerial camera to darkroom assistant in Egypt. IWM ME 2393
The history of aerial photography and the Royal Engineers can be traced as far back as 1882 in Halifax, Nova Scotia when Englishman, Captain Henry Elsdale experimented with a small lightweight camera tethered to a balloon. They were informed by his mapping experience with the Ordnance Survey and by his aeronautical knowledge as an instructor of the Royal Engineers balloon detachment. Coincidentally it was at Halifax that the 12th Field Company R.E. first formed back in 1806 until they were disbanded in 1817. The first aerial view of Stonehenge was taken in 1906, by Lieutenant Philip Henry Sharpe from the Royal Engineers’ Balloon Section. It was the first aerial photograph of any British archaeological site.
During the First World War Photographic Reconnaissance was mainly used for artillery spotting or in support of the Army. Only later was it utilised with a more tactical, strategic and economical purpose.
After the First World War there was a drive to realise the potential of aerial photography in new fields of geographical and archaeological analysis away from the battlefield. In 1919 G.A. Beazley published an article entitled Air Photography in Archaeology, in which he described wartime aerial survey work carried out around Samarra in modern-day Iraq. The survey had revealed the layout of an ancient city, details of which were transferred to a military map, though they were evident only from the air.
Another pioneer of aerial archaeology was O.G.S. Crawford, who was appointed the first archaeological officer at the Ordnance Survey in 1920. He used air photographs made by the RAF to measure the length of the Avenue at Stonehenge, and later joined with Alexander Keiller to make an aerial survey of archaeological sites in several British counties. Together they published Wessex from the Air in 1928.
During the Second World War the Mediterranean Allied Photo Reconnaissance Wing (MAPRW) was the reconnaissance and intelligence arm of the Mediterranean Allied Air Forces (MAAF). These had previously been known as Northwest African Photographic Reconnaissance Wing (NAPRW) and Northwest African Air Forces (NAAF) respectively until renamed in December 1943. They were comprised from the Royal Air Force (RAF) / South African Air Force (SAAF) / United States Army Air Force (USAAF).
Bomb-aimer holding an F24 aerial camera in the nose of a Blenheim. IWM C 1314
Operating from bases in North Africa and Italy, these photographic reconnaissance units (RCU) took aerial photography of targets throughout the Mediterranean theatre, southern and eastern Europe, for subsequent analysis by photographic interpreters at MAPRW. Imagery was also collected to provide a basis for cartography of enemy-occupied territory.
It is not known exactly what Lieutenant D.V Hutchinson M.B.E. would have studied during these courses and lectures. Knowing now, that in a matter of weeks, he would be selected to lead the Vanguard Section of the 12th Field Company R.E. to relieve the Australian Garrison of Tobruk. It could be assumed that he was learning new techniques to determine enemy movement and strategy in the region.
Studying the topography and military features shown in the images, coupled with familiarity of the area that Lieutenant D.V Hutchinson M.B.E. had been deployed in at the begining of 1941 during Operation Compass, would obviously play a tactical advantage having obtained vital knowledge during these courses.
The 12th Field Company R.E. War Diaries of October and November 1941 describe how Lieutenant D.V Hutchinson M.B.E. would leave Tobruk at night and compass traverse the forward lines, possibly with intellegence gained from aerial photographs.
Observer of No.113 Sqn RAF hands over aerial camera at Ma’aten Bagush following sortie over Tobruk. IWM CM24
Later in December after the Axis forces had been repulsed from the perimeter of Tobruk, Lieutenant D.V Hutchinson M.B.E. was sent to decommission enemy vehicles at captured aerodromes that he may have studied in aerial photographs similar to the image below.
The video below was made to give an indication on the distance and topography that faced the fighting forces of the Western Desert. Mapping was vital in understanding the terrain and the sheer logistics involved in this war of attrition.
1941 – Topography of the Western Desert by Nathan Hutchinson.
It is by complete chance as I finish this article, that I happened to look into Douglas Hutchinson’s old war chest and discovered this superb booklet that had never previously caught my attention.
Vol.II No. 7 of The Photogrammetric Record by the Photogrammetric Society with an article on ‘The use of Plotting Machines for 1/1,250 Air Survey by the Ordnance Survey’ written by Major D.V. Hutchinson M.B.E. R.E. in 1955. At this time he was in the U.K. in Chessington performing Survey duties for Ordnance Survey before being posted once more overseas to Cyprus.
I certainly hope to cover this article in greater detail in the future.
TOP COVER IMAGE – No.39 RAF Sqn with a Type F.24 camera after a sortie in the Western Desert
Please look out for upcoming articles to find out the incredible journey of D.V. Hutchinson as he and his 12th Field Company return back through Palestine to the beseiged port of Tobruk. Then later when he was serving in India & Burma, he continued to use his extensive knowledge of topography in the field to build airstrips deep in the jungles as part of a Chindit Column in 1944.
Feel free to follow @UbiqueVir on Twitter for updates.
This article is written in memory of the men that served in the 12th Field Company Royal Engineers during the First World War. Until recently, I knew little of the early history of the Company to which Col. D.V. Hutchinson M.B.E. served with for four years during the Second World War, apart from the few details that I managed to compile in this websites introduction to their history shown here.
I have decided to commemorate their memories on the anniversary of The Action at Hooge which took place on 9 August, 1915. It is, to my knowledge, the single most devastating action in the history of the 12th Field Company RE to date. In this article, I describe the path that led them to this fateful day.
All information below is taken from the 12th Field Company RE War Diaries WO 95/1599/1 and external sources that are credited with the relevant paragraphs.
The Field Company RE
1915 – Royal Engineers constructing a pontoon bridge. IWM Q53955
In 1914, each Infantry Division included two Field Companies. A third was added during January 1915, as more units came up to strength and passed training. Click here for a list of Field Companies. The Field Company was composed of 217 men, as shown here. •Major in command of the Company •Captain second in command •3 Lieutenants (or Second Lieutenants), one each commanding a Section •23 NCOs (Company Sergeant-Major, Company Quartermaster Sergeant, Farrier Sergeant, 6 Sergeants, 7 Corporals, and 7 2nd-Corporals [a rank peculiar to the Royal Engineers and Army Ordnance Corps]) •186 other ranks (1 Shoeing Smith, 1 Trumpeter, 1 Bugler, 138 Sappers, 37 Drivers, 8 Batmen) •2 attached Privates of the Royal Army Medical Corps for water duties •1 attached Driver of the Army Service Corps (not counted into strength as officially he was part of the Divisional Train)
A detachment of the Field Company (a proportion of the above) was left at the Base, as reinforcements.
The men were organised into two areas: Mounted (which included the CQMS, the Farrier, the Shoeing Smith, trumpeter, 3 NCOs and the drivers and batmen) and Dismounted. The latter represented many kinds of trades required by the army in the field, including in the numbers shown above 15 Blacksmiths, 20 Bricklayers, 40 Carpenters, 5 Clerks, 12 Masons, 6 Painters, 8 Plumbers, plus surveyors, draughtsmen, wheelwrights, engine drivers and others.
The Field Companies relied on horses for transport and had an establishment of 17 riding horses for the officers and NCOs of the Mounted Branch, plus 50 draught heavy horses, and 4 pack horses. There were also 5 spare draught horses as replacements.
With the exceptions of the Trumpeter and Bugler, all other ranks were armed as infantrymen, carrying the SMLE rifle.
The above information on Field Companies was shared from Chris Baker’s site The Long, Long Trail. A fabulous and much recommended trove of information on the British Army in the Great War.
When War was declared between the British Empire and Germany on 4 August 1914, the 12th Field Company RE were stationed at the Officer Cadet Training Barracks (OTB 7) at Moore Park in County Cork, Ireland. The following day saw warrants issued for the families of married N.C.O.s to return to their homes. Medical inspections of the men took place before the order to mobilise was received and on 13 August 6th Division were ordered to England.
The 12th Field Company RE made up one of the Engineering units within the 6th Division. At this time the 6th Division was a commanded by Major-General J.L. Keir with Lieutenant-Colonel G.C. Kemp commanding the Royal Engineers.
The 6th Division was one of two regular army divisions within III Corps. This was created to conform to the two-division army corps organisation employed by the French armies that the British Expeditionary Force (BEF) was to operate alongside.
III Corps was commanded by Major-General William Pulteney along with Major-General Sir Frederick Manley Glubb appointed Commander Royal Engineers (CRE) making him the senior engineering officer in the Corps, responsible for the defences and support of the two infantry divisions.
III Corps, along with the IV Corps, formed the Second Army which was created later in the year on 26 December 1914, when the British Expeditionary Force was split in two due to becoming too big to control its subordinate formations. At the begining of the War the Second Army was commanded by General Sir Horace Smith-Dorrian.
Marching from Moore Park on 13 August 1914, via Ballynahown and Fermoy, 12th Field Company RE arrived in Queenstown, Cork on 19 August. Two days later they commenced embarkation on S.S. Maidan arriving at Liverpool on 22 August.
From Liverpool the Company travelled to Cambridge, arriving on 24 August, whereupon they took part in a Divisional Route March and a Group Exercise with the 16th Infantry Brigade the following day.
On 7 September 12th Field Company RE received the order to move, travelling via Royston, they arrived in Southampton embarking on S.S. Oxonian setting sail for France at 0900 hrs.
12th Field Company RE arrived at St Nazaire on 10 September, moving to a camp at Grand Marais. From there they moved through Marles, La Chapelle, marching on to Jouarre and arriving in Buzancy, NE of Paris by 17 September. On the 19th they were assisting in the defences at Belleu. The Company continued trenchworks in this area for the rest of the month and at the start of October they had moved southeast to Vailly where they were building defences with the 1st Battalion, Buffs (East Kent Regiment) and the 1st Battalion, Leicestershire Regiment. By the middle of October the 12th Field Company RE had moved north towards the Belgium border at Merris, joining the Column to advance on 14 October 1914. At the end of the month they were at Fleur Baix, just inside France to the south of Ypres, having seen the Germans attacking the 16th Infantry Brigade and were now occupying the trenches they had only worked on days before.
1915 Bois d’Elville, 2nd Bn Leicestershire Rgt rush a position. H.D. Girdwood
At the start of November the 12th Field Company RE were still in the area around Fleur Baix continuing works on communication trenches amidst the continued threat of enemy shell fire, with reports on 5 November of Company horses hit with one killed. By the middle of the month, they relocated billets to Erquingham where they worked on trenches occupied by the 1st The Buffs once more.
The Company carried out a variety of works at this time, including laying trip wires and blowing a gap in the railway just in front of their own lines. They were also making up charges to put in the 1st Leicestershire trenches in case the Germans took them, as well as mining the advanced trench of the 2nd The Durham Light Infantry.
12th Field Company RE carried out a series of experimental tests at this time, under the watchful eye of Lord Roberts, the Division C.R.A. and C.R.E. Including a new rifle grenade that initially propelled only 60 yards, failing to detonate, eventually by 17 November it was reported a rifle grenade successfully travelled 200 yards before exploding on impact. They also made grenades from old jam tins but found these could only be thrown 20 yards.
On 30 November 12th Field Company RE were constructing a bridge over the river Leie at Bac St Maur to replace an existing pontoon bridge. The picture below, although taken at a later date as you can see by the Brodie helmets that weren’t worn until the following summer, shows construction methods deployed by Sappers at the time, with bundles of brushwood in the background used for making fascines.
Field works are as old as armies with examples of Roman Legions forming entrenched camps. Early examples of using field works to block enemy lines of advance date to 1700s Europe, the Maori’s in the 1800’s, with ‘massive trench works and trench warfare’ throughout the Crimean War and extensively during the American Civil War and Boer War.
At the outbreak of the First World War, technology was advancing at a dramatic rate. The introduction of rapid firing artillery and high explosive fragmentation rounds made attacking on open ground far too dangerous. The method of outflanking an entranched enemy became popular to the south during the Battle of Aisne. But by the end of October 1914 the entire Western Front from the North Sea to the Swiss border was solidified into two sides of trenches that would last until the end of the War. This created a stalemate between equals as the continuous trench lines had no open flanks. On occasion the rigid trench systems would brake down but the lines would never move very far, usually near strategic railheads due to the ineffectiveness of horse and cart in carrying the vast amount of munitions required.
A British Soldier in a trench during WWI. Britannica
Geography played a huge part in the establishment of the trench systems, with the small of rises in elevation being strategically important with hills being named after their height in meters (such as Hill 60) which had excellent views on the ground around Ypres. The ability to build and maintain trenches in such locations was vital.
Trenches were built in a stepped pattern with straight section no more than 12 meters. Combat trenches later included fire bays connected by traverses. This ensured the entire trench could not be enfiladed if the enemy gained access at any one point; or if a bomb, grenade, or shell landed in the trench, the blast could not travel far.
The British began the War by building a trench system of three parallel lines, interconnected by communications trenches. The point at which the communications trench intersected the front trench was of critical importance and thus heavily fortified. At around 65-90 metres behind the front trench was located the support trench or travel trench which the garrison would retreat when the front trench was taken. Between 90-270 metres to the rear was a third reserve trench where reserve troops could amass for a counter-attack if the front trenches were captured. However this layout soon became obsolete as the power of artillery grew, but some areas would maintain support lines to give the impression they were still occupied. Saps were temporary, unmanned utility trenches that spurred off the front line into no-man’s land, used as listening post’s or jump-off points for surprise attacks.
The 12th Field Company RE War Diaries also referred to evacuation trenches and ammunition trenches to be used as such. Along with these earth works the Company also built Machine Gun emplacements, shelters and working on other buildings toward the rear of the lines, such as field dressing stations.
When a front line extended into the enemies lines in a bulge a salient is formed. The concave trench line facing the salient was called a re-entrant. Large salients were perilous for their occupants because they could be assailed from three sides. Behind the front system of trenches there were usually at least two more partially prepared trench systems, kilometres to the rear, ready to be occupied in the event of a retreat.
The Ypres Salient was formed toward the end of December 1914 as British, French, Canadian and Belgian troops defended against the German advance. The German troops had now dug in on the higher ground east of Ypres, which is where the 12th Field Company RE now faced them on the border of Belgium.
Trench construction also advanced from the simple designs used early on in the War, that saw shallow trenches packed with men shoulder to shoulder, suffer massive casualties. They grew deeper and more complex, able to resist artillery bombardment and infantry assaults. There were three main methods of construction. Entrenching, where the men would dig down from the surface, which was efficient yet exposed so normally carried out in a rear area or at night. Sapping involved digging away at the end face, less exposed but limited to two men digging at a time. Tunnelling was similar to Sapping apart from a ‘roof’ of soil being left in place whilst the trench was established and removed when the trench was ready to be occupied. It was estimated that a 250 metres front-line trench would take 450 men 6 hours to complete at night.
Timber frames were introduced in 1916 to support the revetment. Geological Society
Low lying areas were subject to flooding as drainage trenches were destroyed by continuous shelling. So here trenches were built above ground, formed by tall breastworks of sandbags filled with clay.
These breastworks were fronted with parapets, with the rear embankment called a parados which protected the soldiers back from shells falling behind them. These parados were later reduced in size so if the trench was occupied by the enemy then it was easier for snipers in the trenches further back. The sides of the trenches were revetted with sandbags, wire mesh or wooden frames or hurdles made from brushwood. The floor of the trench was usually lined with footboards or duckboards, along with ladders to enable the soldiers in and out of the trenches.
At the same time as constructing all of the above trench works, the 12th Field Company RE also built chevaux-de-frise which are long, wooden or wire defences. Hundreds of fascines made of brushwood, that were used for shoring up trenches but later used to assist armour in crossing trenches when tanks entered the battlefield later inthe war. Laying barbed wire as another feature of fortification within the trench system.
Hundreds of civilians were used to assist in the completion of these works, in both gathering the required materials such as brushwood, demolishing existing buildings, and in helping to build the new defences. Although it was reported that they often understandably refused to work when enemy shelling increased.
January 1915 saw the 12th Field Company RE, now under command of Major-General W. N. Congreve VC of 6th Division, near Rue-du-Bois, moving into the billets at Armentieres Asylum. They worked on revetments and shelter for the 17th Infantry Battalion, at the same time as building up materials for breastworks and building parapets with corrugated iron. The remainder of the month was spent on breastworks with 16th and 17th Infantry Battalions as well as constructing a bridge over the moat at Fort Egale and at the end of January they were loopholing (prepare openings in walls to fire from) buildings in Bois Grenier.
February 1915 continued with works on communications trenches at Armentieres, making bridges and revetments with Canadian working parties from 17th Infantry Battalion. Various field works carried on into the following month and on 11 March the 12th Field Company RE took part with two Companies of 1st The Prince of Wales’s (North Staffordshire Regiment) in an attack on L’Epinette in the Battle of Neuve Chapelle.
Officers of 1st Battalion, August 1914. Only 5 still serving by January 1915, all others KIA or wounded. Credit
Trench works subsequently began in this area for the next few weeks, alongside 16th, 17th and 19th Infantry Battalions. It was around this time, on 22 April 1915, at the Second Battle of Ypres, the Germans (violating the Hague Convention) used chlorine gas for the first time on the Western Front. Several types of gas soon became widely used by both sides, and though it never proved a decisive, battle-winning weapon, poison gas became one of the most-feared and best-remembered horrors of the war.
Field works continued in the region of Armentieres until 28 May when the 12th Field Company RE marched north across the border into Belgium, via Nieppe and Bailleul, finally arriving N.W. of Ypres on 31 May.
The begining of June 1915 saw the Company working on wires in front of trenches, sandbagging trenches, and making footboards at a disused factory near Ypres. They were also working near Potijze, pulling down houses and digging trenches. On 9 June 12th Field Company RE moved to billets north of Vlamertinge near the Château. On 12 June the Company were called to assist in putting out the fire at the church after it was hit by shell fire. After the attack on Railway Wood on 14 June the following weeks were mainly spent filling sandbags and building footboards and hurdles at Potijze, with continued trench work with 14th Infantry Division.
July 1915, the Company are still billited at Vlamertinge Château, with most works concentrated at Potijze. With assistance from local civilians they also began to clear out Bellewaerde Beek, which was the main river that ran across the lines to the east of Ypres. On 14 July they began work on Picadilly communications trench and ended the day with rest on account of inoculation. Over the following days works continued on Picadilly communications trench along with work on Machine Gun emplacements on the second line and continued clearing of Bellewaerde Beek.
On 19 July 1915, as the 12th Field Company RE continued the above works and begun work on a new front line; nearby, Lieutenant Geoffrey Cassels, the Officer in charge of the 175th Tunnelling Company RE (operating with the 3rd Division) was just a short distance south east at the small village of Hooge.
The Allies had previously captured the area during the First Battle of Ypres and the Château de Hooge was used by the 1stand2nd Divisions for their joint headquarters. During the Second Battle of Ypres, Hooge was again the site of intense fighting with the town and Château now completely levelled. Despite July being a relatively quiet period on this part of the Western Front, it is still estimated that there was an average of 300 casualties every day.
Having spent the last five and a half weeks attempting to dig a tunnel under the German lines. The 175th Tunnelling Company RE successfully built several tunnels, with the main one being 60 metres long and from there, a mine was charged using 3,500 lbs of explosive ammonal, gunpowder and guncotton. The largest mine of the war so far was detonated at 1900 hrs, leaving a crater 40 metres wide and 6 metres deep.
In the flat and barren landscape a crater of this proportion now had a huge tactical advantage. But it didn’t come without casualties as it was taken by the 1st Gordon Highlanders and the 4th Middlesex with the latter losing 10 men instantly, killed by debris as they waitied in forward positions. This almost led to Lt. Cassels arrest afterwards, but he was later praised for his efforts and awarded the Military Cross. It is estimated the Germans lost several hundred men from this action.
The map below shows German trenches in red corrected in September 1915 and gives an indication on how well they were dug in at this point. I have crudely added the British trenches in blue to show their approximate location. With several of the familiar names mentioned on the War Diary of the 12th Field Company RE. As you can see, their H.Q. throughout June-August is at Potijze Château in the top left corner of the map, and the vast, sprawling network of trenches which was far more complicated than the rough lines I have showed below. The areas of no-man’s land would have been even narrower in reality, in some places only whispering distance.
Summer 1915 – Locations of 12th Field Company RE near Hooge. 1:10,000, map
25 July 1915 C.R.E. decided that practically the whole of Strand and Fleet Street would have to be realigned. It was common place for trenches and landmarks to share the same names as those familiar to the troops from back in England, such as Bond Street, Oxford Street and Haymarket. And it wasn’t unknown for near complete trenches to be abandoned for other field works to begin nearby.
12th Field Company RE spent the rest of July continuing work from the Warwick Line to the north near Potijze and the new front line at Crump Farm towards Verlorenhock, at Haymarket, Bond Street and Cheapside. Further Machine Gun emplacements were created to protect the right flank.
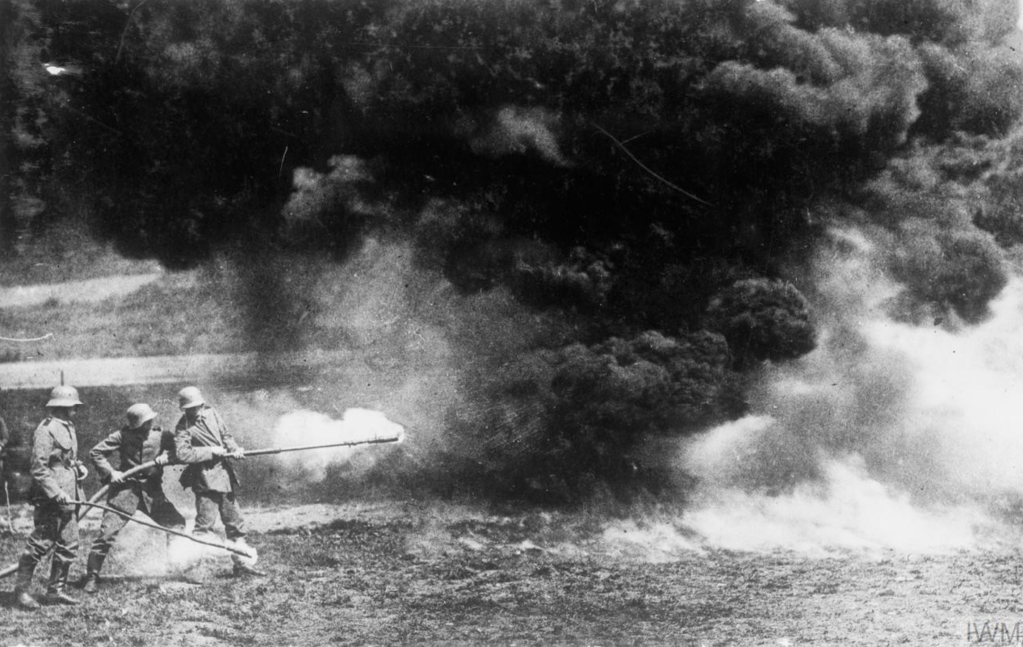
German flame throwers in action on the Western Front. IWM Q41844
It was on 30 July, the Germans used Flamethrowers for the first time in the War, which threw back the 41st Brigade and pushed the front line south back to Zouave and Sanctuary Woods. The Germans had achieved complete suprise in the attack and after fierce hand to hand combat, virtually all British held positions were lost. The 43rd Brigade relieved the 41st, and managed to repulse another flamethrower attack that same night. The 14th Division lost just under 2,500 officers and senior N.C.O.s on this day, which hurt the British Army considerably over the coming months.
General Plumer, commanding the British Second Army at Ypres, ordered that 6th Division was tasked to retake the old line of late July, as described below by the brilliant Durham at War and David Ramsdale websites.
The now reinforced 2nd Durham Light Infantry together with the 1st King’s Shropshire Light Infantry on its left and 2 Sections of 12th Field Company RE were chosen for the attack. Just after midnight on Monday 9 August 1915, rum was issued to each man. In addition to the usual weapons and equipment, they had to carry additional rifle ammunition, sandbags and shovels, plus one day’s ration and a full water bottle. These men were about to attack at night across 500 metres of rising ground, hindered by shell holes, broken trees, shattered trenches, barbed wire and the unburied dead from the earlier fighting.
At 2.45am, the British artillery opened fire. Twenty minutes later, the men advanced as near as was possible to the German front line and lay down to await the end of the shelling. At exactly 3.15am, the bombardment lifted and they attacked.
The battalion overran the German and re-established the British line on the north of the Menin road at a cost of nearly 200 dead and 270 wounded.
Attack of the 2nd Battalion, Durham Light Infantry, at Hooge, Germany, 9 August 1915. DLI Museum
“Our artillery opened fire and they replied. It was simply awful but we lay there waiting for the order to charge. It came and we lost all control of our senses and went like mad, fighting hand to hand and bayoneting. We got into the first line and went straight on and then dug ourselves in under hell’s flames.”
(D/DLI 2/2/47(1)
The 12th Field Company RE War Diary gives the following account of the day.
YPRES
9.8/15
6AM

Wounded from attack began to come in.
Collected information during day from those returning.
All officers hit but cutting successfully carried out in front of captured trenches.
Sappers working on reserve parapets aid digging communications with work not satisfactory owing to heavy shelling.
From reports it seems doubtful whether Sappers were usefully employed after briefing completed.

Casualties     K     W     M
  Officers     -     2     1
     O.R.s     70    18    9

Went up at night with remainder of Company but found trenches too full of wounded to allow of useful working done.
The figures from the war diary do not match those remembered below. But there is no doubt that 9 August 1915 is the darkest day in the history of the 12th Field Company.
According to details found on the Commonwealth War Graves website, 96 men of the 12th Field Company RE lost their lives during the First World War. Many of them died within the actions that you have read about leading up to this date. With the following 18 men killed in action on 9 August, 1915.
Rank/Name
Service Number
Age
Memorial
Sapper Robert McGibbon
21178
25
Menin Gate Memorial Panel 9
Sapper William Henry Greenslade
19305
27
Menin Gate Memorial Panel 9
Sapper Percy John Brimblecombe
28306
–
Thiepval Memorial Pier 8A & 8D
Sapper Joshua Wagstaff
9624
–
Menin Gate Memorial Panel 9
Serjeant Edward James Barton
18447
–
Thiepval Memorial Pier 8A & 8D
Sapper William Hellings
6388
36
Menin Gate Memorial Panel 9
Sapper John Easton
10268
–
Menin Gate Memorial Panel 9
Sapper James Donnellan
15726
–
Menin Gate Memorial Panel 9
Sapper John Shiels
18118
25
Menin Gate Memorial Panel 9
Serjeant Timothy O’Connell
17162
27
Menin Gate Memorial Panel 9
Sapper William Matthews
13152
31
Menin Gate Memorial Panel 9
Sapper John James Johnson
20906
25
Menin Gate Memorial Panel 9
Sapper Albert Jones
4279
–
Menin Gate Memorial Panel 9
2nd Corporal Thomas O’Shea
19185
29
Menin Gate Memorial Panel 9
Sapper Henry Pattison
23480
24
Menin Gate Memorial Panel 9
Corporal Arthur Harry Piggott
28541
21
Ploegsteert Memorial Panel 1
Sapper Frederick Henry Millgate
17303
28
Menin Gate Memorial Panel 9
Sapper William Edwin Green
30487
18
Menin Gate Memorial Panel 9
The War Dead of 12th Field Company RE on 9 August 1915. CWGC
Praise was received from the Brigade, Division, Corps and Army commanders and Sir John French commander of the BEF said of the assault it was “…one of the best conducted of the smaller operations of the campaign”. The line here remained static after the battle until it was lost by the Canadians in June 1916.
12th Field Company RE remained in this area for the rest of August, completing defence works at the crater. As you can see from the image below it was a strategically important landmark, creating protection in an otherwise flat land.
The 12th Field Company RE continued field works in the Verlorenhoek-Hooge sector, finally moving out of the front line in November 1915, where they were engaged in rear area camp improvements.
Over the following years they continued moving around the Western Front, employed in field works, they were present in the following Battles:-
Battle of Flers-Courcelette/15-22 Sep 1916
Battle of Morval/25-28 Sep 1916
Battle of Le Transloy/1-18 Oct 1916
Battle of Hill 70/15-25 Aug 1917
Battle of Cambrai/2 Nov – 3 Dec 1917
Battle of St. Quentin/21-23 Mar 1918
Battle of Kemmel/25-26 Apr 1918
Battle of Scherpenberg/29 Apr 1918
Battle of Epehy/18 Sep 1918
Battle of St. Quentin Canal/29 Sep – 2 Oct 1918
Battle of Beaurevoir/3-5 Oct 1918
Battle of Cambrai/8-9 Oct 1918
Battle of Selle/17-25 Oct 1918
The Company finally disembarked for Tilbury, England on 30 May 1919. Before moving to Limerick in Ireland on 6 June 1919.
One by one, the Central Powers quit: first Bulgaria (September 29), then the Ottoman Empire (October 31) and the Austro-Hungarian Empire (November 3). With its allies defeated, revolution at home, and the military no longer willing to fight, Kaiser Wilhelm abdicated on 9 November and Germany signed an armistice on 11 November 1918, ending the war.
The total number of military and civilian casualties in World War I was about 40 million: estimates range from around 15 to 22 million deaths and about 23 million wounded military personnel, ranking it among the deadliest conflicts in human history. The total number of deaths includes from 9 to 11 million military personnel, with an estimated 887,858 British lives lost.
Please click here if you would like to read more about the 12th Field Company Royal Engineers during the Second World War.
Having arrived just south of Damascus on 10 July 1941, 2nd Lieutenant D.V. Hutchinson M.B.E. and the rest of the 12th Field Company R.E. saw the final throws of Operation Exporter play out with the ceasefire sounding at 00:05 hrs 12 July.
With full military precautions still observed, the Company now moved northwest through Damascus, camping at a stream in woodland near Damour. They took over the waterpoint from 2/15th Australian Field Company R.A.E. and the following day moved out, with Mount Hermon to their left, towards Zahle.
1941 – South-western Syria.
The following article describes one of the few oral accounts in living memory, a story told by Douglas Hutchinson to one of his sons many years later. This recollection is combined with details of the 12th Field Company War Diaries (WO 169/1867) and the following sources [1][2][3] .
Decades later in the 1980s, Douglas sat in the sunroom at his bungalow on the south coast of England and told his son of the time he took his Section on leave to a Syrian village, shortly after they had arrived near Damascus. On arrival to the village 2nd Lieutenant D.V. Hutchinson M.B.E. allowed for his men to ‘seek comfort’[1] from some of the local inhabitants. Few memories of this evening have survived the years apart from the fact that apparently many of the men of 12th Field Company would later require treatment for syphilis among other dieases caught at this time.
The War Diary mentions that Zahle was open for leave parties on 20 July 1941, which was home to a brothel run by the British Army as detailed below.[3] Could this be the date and location of the story that Douglas told his son? Maybe the fact that 2nd Lieutenant D.V. Hutchinson M.B.E. was soon to be chosen to lead the vanguard Section of 12th Field Company back to the Siege of Tobruk was due to him not contracting any of these diseases that befell his fellow troops? Was he just lucky or abstained from the services provided by the local workers? Answers to ponder, but lost to time.
In the same region at the same time the 2nd Australian Imperial Force (AIF) suffered the Army’s first malaria[2] epidemic of the war when 1400 troops succumbed to the disease during the six-week campaign. Fortunately the outbreak of malaria was shortlived due to the campaign not lasting very long, and troops being withdrawn from malarious Syria and Lebanon to the controlled areas of Palestine, in addition to the summer of 1941 being unusually dry and a greater understanding of malaria control.
Zahle – taken from the Anti-Lebanon with Mount Lebanon in the background. [4]
Zahle15/712th Field Company R.E. moved out and crossed for R.D.I.s with 14th Infantry Brigade Group.
Column moved through to Zahle.
Enthusiastic welcome from local inhabitants.
Vichy troops showed rather indifferent attitude to our arrival.
Company bivouaced on hills to S of Zahle.
16/7
Water reconnaissance carried out.
Water point set up for Inf visit by C.R.E. 6th Division.

17/7
Various works e.g. water points, latrine seats etc started.
Baggage by rail arrived.

18/7
Work in 14th Infantry Brigade Group area continued.
Section sent to salvage Battlefield near Damascus.

19/7
Preparations for G.O.C. in C.’s MIDDLE EAST visit.
Rehearsal of arms drill etc carried out.
Area marked out for G.O.C. in C.’s inspection.

20/7
Church parade at 0900 hrs. Bathing Parade after church.
G.O.C. in C.’s visit cancelled.
Works continued.

Zahle opened for leave parties from 1400 - 2130 hrs.
1941 Zahle – Prostitutes standing in a street outside a British Army brothel. AWM P03498.006
Syrian Sex Workers
The date 20 July seems a likely candidate for 2nd Lieutenant D.V. Hutchinson‘s story of the Companys encounter with the Syrian Sex Trade. Both location and time are correct, but the War Diary later states that 12th Field Company began to leave Zahle at the begining of September with hospitalisations occuring weeks later on 24 September as they moved back towards the Canal Zone. So that leaves a further 8 week period to when the men took leave in and around Zahle, with symptons showing up 2-6 weeks after infection.
August 1941 happens to be the exact time when these remarkable images were taken, I happened upon them on the brilliant Australian War Memorial website. Both images claim to be taken in a brothel in Zahle that was reputedly run by the British Army for British troops only. There was no further information.
1941 Zahle – Nell and Lilee, standing inside a British Army brothel. AWM P03498.007
This in turn led to me discovering a remarkable online document written by Pascale Nancy Graham which detailed an incredible history of Sex Work in French Mandate Lebanon and Syria.
She describes in remarkable detail the long history of Sex Workers in the Ottoman Empire, the fluctuation of demand as war and trade moved through the region. As far back as the 16th Century it is stated that elite soldiers were permitted the right to visit local prostitutes and were not subject to the customary fines.
Records show there were few quartiers resérvés ‘red-light districts’, with most Sex Workers gaining business from bars and coffeehouses or in maisons de tolérance or maisons de rendez-vous ‘brothels’. The workers were both local and from further afield from Poland and Greece, single, sometimes married, with some reports detailing young boys in North Africa.
Over the years the authorities attempted to enforce various regulations and medical exams in an attempt to keep disease under control and with the increased British presence in the region it meant that they had direct influence on French colonial policy pertaining to sex work. British authority over maisons proved to be a contentious issue, even though French officials acquiesced to Britain’s demands, with further conflict whether the brothels should return to civilian use after the troops had withdrawn from the region. British, French and Greek authorities all ran various establishments in an attempt to limited the spread of venereal diseases amongst their troops.
The subject of Sex Workers in Syria is as vast as it is contentious, an interesting element to war that I had never spent time to consider. No doubt an inportant factor to many serving personnel during those impossible times in foreign lands.
1941 – Zahle.
TOP COVER IMAGE – 1941 Zahle – Prostitutes standing in a street outside a British Army brothel. AWM P03498.006
Please look out for upcoming articles to find out the incredible journey of D.V. Hutchinson as he and his 12th Field Company receive another Warring Order to return to the beseiged port of Torbruk. Feel free to follow @UbiqueVir on Twitter for updates.
By early July 1941 2nd Lieutenant D.V. Hutchinson M.B.E. was 22 years old. The previous year had been spent in the Western Deserts where he had earned his MBE during Operation Compass, continued training in Egypt and partaking in Operation Brevity and Operation Battleaxe with the 12th Field Company R.E.
The Company now moved East on the road to Damascus soon after Sir Archibald Wavell, who had received a recent change of Command by Churchill, displeased with the results of Operations Battleaxe and Brevity.
Montgomery, Wavell and Auchinleck. New Delhi. IWM IND5205
Wavell exchanged duties with General Claude Auchinleck, Commander-in-Chief, India on 20 June. Unfortunately Wavell had the misfortune of being placed in charge of another undermanned theatre which became a war zone on several fronts; firstly during the recent Anglo-Iraqi War in April/May 1941 with the Vichy French assisted by the Germans, this ultimately led to the current June/July Syria–Lebanon campaign, also known as Operation Exporter. Later when Iraqforce invaded Persia in August and finally when the Japanese declared war on the United Kingdom in December 1941.
The strategic importance of Syria and Lebanon included not only the obvious oil supply routes running from Iraq to the Mediterranean Sea. But also an important barrier to stop the German advance on Egypt as well as the Axis forces using Iraqi and Vichy French airbases for further attacks against the British. After the recent German victories in Greece and North Africa and the ongoing East African Campaign, Syria and Lebanon would be vital for the Allies to secure from a determined Vichy France.
2nd Lieutenant D.V. Hutchinson M.B.E. and the 12th Field Company R.E. were, at this time, in the 23rd Infantry Brigade of the 6th Infantry Division. They provided invaluable support to the numerous armoured and infantry Battalions , recently having served with 22nd Guards Brigade in Operations Battleaxe and Brevity.
During the move 12th Field Company R.E., still under the command of Major P.H. Haviland were attached to the 14th Infantry Brigade commanded by Brigadier B.H. Chappel, placed under No.3 C.R.E. Western Desert Force and divided into rail, road and baggage parties.
12th Field Company R.E. had already withdrawn from The Western Desert on 1 July, handing over works to 4th Field Company Sappers and Miners & 232 Field Company Royal Engineers at Bagush Box. 2nd Lieutenant D.V. Hutchinson M.B.E. having only just returned from the forward area at Sidi Barrani the week before with 3 Section.
The following article describes the move from Egypt to Syria and is taken from the 12th Field Company War Diaries (WO 169/1867) with further details sourced from a combination of several webpages [1][2][3].
Berbeita Bagush3/712th Field Company R.E. baggage party left Sidi Haneish station with all accommodation, stores and a large quantity of G1098 equipment.
During that time the majority of 12th Field Company R.E. remained at Bagush to work on defences and A/T ditches with 21 M.E. Coy N.Z.E., 4 Fld Coy Indian Sappers and Miners, 552 Army Troop Coy R.E. and Durham Light Infantry working under C.R.E. 6th Division and C.R.E. 4th Indian Infantry Division.
4/7
Road party left Berbeita at 0630 hrs.
Train party left Sidi Haneish station by leave train at 0730 hrs. Connections for journey were good throughout although trains very slow.
Company arrived Quassassin Camp 2215 hrs with hot tea provided on arrival by the Bedfordshire and Hertfordshire Regiment.
Company come under Command of 14th Infantry Brigade.
5/7
Accommodations completed with anti-mosquito nets added to the tents.
0930 hrs Road party arrive at Mena Camp, but staging order was cancelled and the party moved on to Quassassin Camp at 2130 hrs.
6/7
Various items of stores were drawn up from R.A.O.C. Including 13 3ton lorries 10 15cwt lorries & 7 motor cycles (MC's) & 1 No.4 pumping set. 2 S.M.G.s.
Preparations for move were made.
Quassassin7/7
The 30 vehicles of the 12th Field Company Royal Engineers departed Quassassin at 0706 hrs, crossing the Suez Canal at Ismalia pontoon bridge.
Convoy ran well all day, new vehicles proved satisfactory.
Technical stores of 12th Field Company RE arriving by rail.
Route:
Qassassin-Ismailia Canal Crossing
Asluj-Gaza-Ramle-Lydda Kilo 100 Rd
Haifa-Jaffa
8/7
The 12th Field Company RE left Asluj at 0705 hrs, travelling via Beershera, Gaza, Ramleh to Beit Lid Camp near Natania, arriving at 1500 hrs.
Baggage party was due at Tulkarm Station but had not arrived.

9/7
The day was spent at Beit Lid awaiting baggage.
Bathing party arranged in afternoon & cinema party in the evening.

10/7
Company left Beit Lid at 0715 hrs, moving through Naibe Acre, Safad and Roshpinwa to Syria.
In spite of stops, hills and bad roads, a days run of 160 miles was completed with only a few breakdowns. No vehicles had to be put on tow.
That night 12th Field Company RE camped on ploughed land about 12 miles South of Damascus.
1941 Camp in Syria (source unknown)
Operation Exporter
By this point the Campaign was in its 5th week, with hostilities commencing on 8 June. The BritishGeneral Sir Henry Maitland Wilson had proposed four lines of attack from the border of Iraq, Palmyra to the north, Palestine, Damascus and Beirut.
1941 – South-western Syria.
Early battles saw the Australian 7th Division advance on Beirut against a combination ranging between fierce resistance from the Vichy French defenders to a disorganised and scattered force. The Australian21st Brigade advanced at the Battle of Litani river and were temporarily slowed down by shelling from two Vichy French destroyers, further hampered by the Allies attempting to avoid shelling the many historic buildings towards Sidon. But by 13 June the Brigade had moved north and successfully captured Sidon and made further gains in the Battle of Jezzine, with a few further actions fought to the east between Algerian Tirailleurs and the Australians.
The Battle of Kissoué formed part of the Allied advance on Damascus and is noted for the confrontation between Vichy French and the Free French Forces. The morning of 15 June saw fierce fighting between the 5th Indian Brigade Group and the Vichy troops, followed by a second phase from the Free French. The battle was not a complete success with the Allied defenders at Quneitra surrendering.
During the Battle of Damascus the remaining force, now named Gentforce (named after its commander Major-General Paul Legentilhomme) now led by commander of the 5th Indian Infantry Brigade, Brigadier Wilfrid Lloyd, since 12 June when Legentilhomme had been wounded, pushed onto Damascus from the roads to the south to counter the weak defence in the rear at Quneitra.
Between 18 – 21 June there was a series of bitter fighting between the Allies and the Vichy French, that saw the capture of the stone forts overlooking Mezzeh fall into both hands several times. By 1100 hrs on 21 June the Vichy French were forced to surrender the garrison at Damascus, with fighting continuing as they retreated on the roads to the north.
As well as providing vital relief during the above actions, the Australian Allied force fought gallantly in the Battle of Merdjayoun near Mezze between 19 – 24 June.
Battle of Palmyra on 1 July formed another part of Wilsons four point attack and involved the expanded Allied force known as Habforce, which formed three columns guided by detachments from the Arab Legion. Although not the largest battle, the successful capture of Palmyra allowed the Habforce to continue along the pipeline to threaten the Vichy French forces fighting the Australian 7th Division on the Lebanese coast.
Battle ofDeir ez-Zor is noted for the bold outflanking tactics employed by Allied field commander William “Bill” Slim of Iraq Command. These tactics presaged Slim’s employment of similar tactics in 1945 while commanding the British Fourteenth Army in Burma. Deir ez-Zor was the chief city of eastern Syria with two important bridges across the Euphrates River and once captured allowed an advance to Aleppo in the far north-west of the country. On 3 July Slim took the risk of sending a flanking column, that were already low on supplies to the south-east, whilst the 2/10th Gurkha Rifles attacked from the south-west. The attacking force capitalised on the element of suprise advancing rapidly into the city, capturing prisoners and many vital stores.
Although the Vichy French Air Force still maintained air superiority in this region.
Battle of Damour took place during 5 – 9 July in the French administrative capital of Lebanon just south of Beirut. On 6 July the Australian21st Brigade attacked the Vichy French to the north of the Damour river, and by 8 July the roads were cut off and the town was encircled by the Allied forces.
On 8 July, even before the fall of Damour, the Vichy French commander, General Henri Dentz, had sought an armistice.
Battle of Beirut on 12 July marked the end of hostilities in the Syria-Lebanon campaign of World War II. The advance on Beirut together with the Allied capture of Damascus in late June and the rapid advance of Allied troops into Syria from Iraq in early July to capture Deir ez Zor and then push on towards Aleppo had made the Vichy position untenable.
11/712th Field Company RE remained at Kissque with a route march in the morning.
Major P.H. Haviland reported to C.R.E. 6th Division.
Captain J.E. Weller went forward to find out works being done by 2/15 Australian Field Coy R.A.E.
Cease fire sounded at midnight.
1941 – Diary Appendix VI, Ceasefire.
At one minute past midnight on 12 July, a ceasefire came into effect. For all intents and purposes, this ended the campaign and an armistice was signed on 14 July at the “Sidney Smith Barracks” on the outskirts of the city of Acre.The armistice placed Syria under the French General Charles de Gaulle.
The triumphant entry of the Australian 7th Division into Beirut successfully established the Allied occupation of Lebanon. Beirut later became an important Allied base for Mediterranean naval operations.
12/7 - 13/7
Nothing to report.
In spite of cease fire yesterday full military precautions still observed.
Preparations for move were made.
14/712th Field Company RE moved from Kissque through Damascus towards Damour.
Camped by the stream in woodland.
Water point taken over from 2/15 Australian Field Company.
15/7
Column moved through Zahle.
Enthusiastic welcome from local inhabitants.
Vichy troops showed rather indifferent attitude to our arrival.
Company bivouaced on hills to south of Zahle.
16/7
Water reconnaissance carried out.
Water point set up for Infantry visit by C.R.E. 6th Division.
17/7
Various works e.g. water points, latrine seats etc started.
Baggage by rail arrived.
18/7 - 21/7
Work in 14th Infantry Brigade area continued.
Section sent to salvage Battlefield near Damascus.
Preparations for G.O.C. in C.’s Middle East visit.
G.O.C. in C.’s visit cancelled.
Zahle opened for leave parties from 1400 - 2130 hrs.
22/7Lieutenant D.V. Hutchinson took over buildings in Rayak aerodrome for W.D. use.
Parties worked in R.E. stores under Lieutenant Musgrave at Rayak.
23/7 - 25/7
Work continued in area. Road construction in Baalbek for R.A. carried out.
Major P.H. Haviland attended C.R.E.s conference.
Warring order for bridging Camp received.

26/7 - 27/7
Works in neighbourhood continued.
Slight trouble with local inhabitants (Natives) attempting to steal material from R.E. Stores.
More attempts to steal R.E. Stores. Shots fired over heads of Arabs.
Observed as a day of rest as far as possible.
Trip to Baalbek to visit ruins arranged for about 40 O.R.s
1941 – The ruins at Baalbek.
For the remainder of July 12th Field Company RE continued works at the bridging camp at Qaraoun as well as further training with 14th Infantry Brigade.
The Germans withdrew their remaining presence from Syria, with the British securing the Naval and Air bases, therefor increasing the safety of the oil route from Basra in Iraq to Haifa in Palestine.
British and Commonwealth casualties were about 4,652; the Australians suffered 1,552 casualties, (416 men killed and 1,136 wounded.) The Free French incurred about 1,300 losses and 1,100 men taken prisoner; British and Indian casualties were 1,800 wounded, 1,200 men captured and 3,150 sick, including 350 malaria cases. The RAF and RAAF lost 27 aircraft.
Vichy authorities announced 6,352 casualties of whom 521 men had been killed, 1,037 were missing, 1,790 wounded and 3,004 men had been taken prisoner. The Vichy Air Force lost 179 aircraft, most destroyed on the ground, the navy lost one submarine and 5,668 men defected to the Free French.
1941 – Wireless Control Mobile Unit of RAF Squadron. Nr Damascus. AWM SUK14916
Please look out for upcoming articles to find out the incredible journey of D.V. Hutchinson as he and his 12th Field Company receive another Warring Order to return to the beseiged port of Torbruk. Feel free to follow @UbiqueVir on Twitter for updates.